# Integrating WAF SaaS with AWS CloudFront
This guide walks you through integrating the Check Point WAF with your existing AWS CloudFront distribution.
{% hint style="danger" %}
The WAF must be deployed *after* CloudFront, since CloudFront is the entry point exposed to the public internet.
{% endhint %}
### Prerequisites
Before starting, make sure you have:
* An active **Check Point WAF subscription** with access to the WAF management UI.
* An existing **AWS CloudFront distribution** configured with your domain.
* Access to **update your DNS records**.
### Deployment
#### 1. Deploy WAF SaaS
Follow the instructions bellow:
{% content-ref url="../../../concepts/waf-as-a-service-waf-saas" %}
[waf-as-a-service-waf-saas](https://waf-doc.inext.checkpoint.com/concepts/waf-as-a-service-waf-saas)
{% endcontent-ref %}
in step 1 (Define the website you want to protect) - make sure to input
* Enter the **public URLs** (e.g. `www.example.com`)
* Use the **internet-facing domain**, not the CloudFront domain.
* Provide the **upstream origin URL** (e.g. your CloudFront origin)
* Do **not** set the upstream server as CloudFront — this is a common mistake.
***
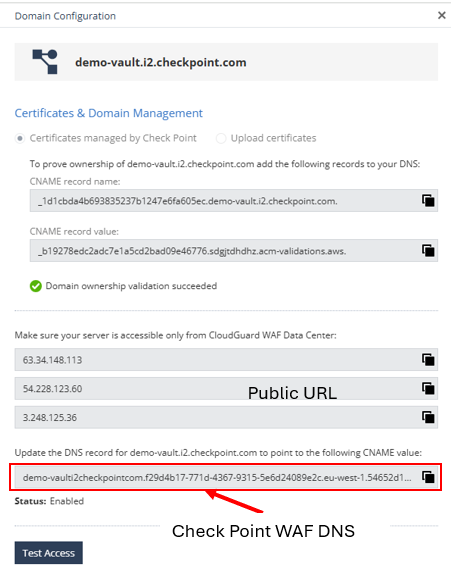
#### 2. Copy the WAF DNS Endpoint
Once the asset has been created the WAF will provides a **WAF DNS endpoint** (e.g., `xxxx.checkpoint.com`).
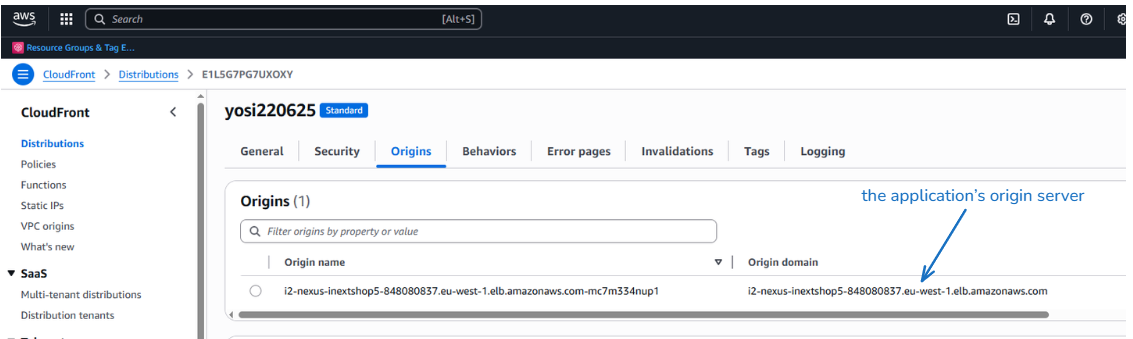
#### 3. Update CloudFront Configuration - Review Current Origin (Before Change)
1. Open your CloudFront distribution in the **AWS Console**.
2. Under **Origins**, review the current configuration (typically pointing to your application server or load balancer).
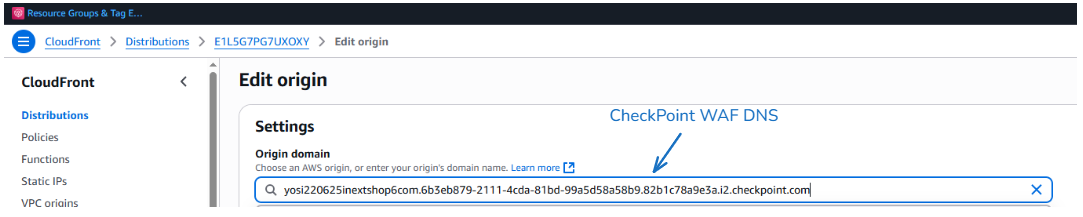
#### 4. Update CloudFront Configuration - Change Origin to WAF
1. Edit the **origin configuration**.
2. Set the **Origin Domain Name** to the **WAF DNS endpoint** from Step 2.2.
3. Save changes.
#### 5. Deploy and Verify Changes
After saving, CloudFront will redeploy with the new settings.
Once deployed, traffic will flow:
```
Internet → CloudFront → WAF → Application Origin
```
#### 6. DNS Considerations
* If **DNS already points to CloudFront** (recommended), no changes are needed.
* If DNS was pointing **directly to your origin**, update it to point to the **CloudFront distribution domain**.
#### 7. Validation
1. Visit your domain (e.g., `https://www.example.com`).
2. In the **WAF logs**, confirm that requests are reaching the WAF.
You have successfully integrated Check Point WAF with CloudFront.
---
# Agent Instructions: Querying This Documentation
If you need additional information that is not directly available in this page, you can query the documentation dynamically by asking a question.
Perform an HTTP GET request on the current page URL with the `ask` query parameter:
```
GET https://waf-doc.inext.checkpoint.com/getting-started/deploy-enforcement-point/waf-as-a-service-waf-saas/integrating-waf-saas-with-aws-cloudfront.md?ask=
```
The question should be specific, self-contained, and written in natural language.
The response will contain a direct answer to the question and relevant excerpts and sources from the documentation.
Use this mechanism when the answer is not explicitly present in the current page, you need clarification or additional context, or you want to retrieve related documentation sections.